Thank you page
It is possible to link your own thank you page to the booking module, this can be done under Settings > Inframe widgets > Thank you page. After booking an appointment or purchasing a product, customers end up on this self-created page (unless you work with confirmation links, they will end up on our standard page).
Do you need multiple thank you pages?
If you want to use different thank-you pages, because you may want to easily measure through which widget the bookings came in (you can also work via Ads/Google Tag Manager) or because, for example, you want a different thank-you page per product / service then that is possible by following the steps below.
Step 1. Encode the URL of the thank you page via https://www.base64encode.org/.
Click on Encode at the top, then paste the URL at Encode and then click on > ENCODE
Step 2. Go to Settings> Inframe widgets and click Generate code and preview.
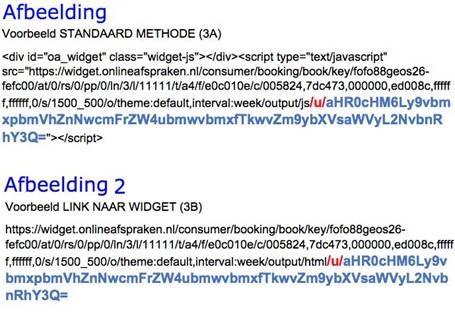
Step 3A. 'Standard method': Paste the code from 'Standard method' in for example a Word file and paste the generated code from step 1 behind 'js' and place '/u/' in front of it (see figure 1 at the bottom of this page).
Or
Step 3B 'Link to widget': Paste the code that is next to 'Link to widget' in for example a Word file and after html '/u/' then paste the generated code from step 1 behind (see image 2 at the bottom of this page)).
Step 4. You then paste the code from step 3A on your website. For example, you can paste the code from step 3B under a button on your website.
Note: If you use confirmation links, you cannot use different thank you pages.